
How competitive 5v5 TS maps are played & what to consider when creating them
Mapping for competitive games is hard. As somebody who has tried to create a map with a non optimal result, I understand the difficulties. It's not only about creating a well crafted visual experience, but also to judge how it might play. General layout, spawn placements, rotation options, positions and their sightlines and proper balancing are difficult to get right individually, but getting all of it right might seem impossible at times. The map should be both fun and competitive, fast but not too open, and not too campy but also tactical. It's a balancing act to achieve a smooth middle ground between these requirements.
This guide is my attempt to help you understand how popular UrT Team Survivor maps are played in a competitive setting (from a player perspective) and why they work in the way that they do. This might give you insight into how future maps could look like and what the boundaries of the gamemode and gameplay meta are. This guide is subjective and written by Arnold. So take it for what it's worth.
Core gameplay mechanics
How rounds are won and lost
- Team Survivor has no objectives (no bomb, no flag). It's essentially TDM without respawn timers.
- Rounds are mainly decided through individual fights on chokepoint positions.
- In addition, some positions might be used for surprise team rushes depending on spawn and scenario.
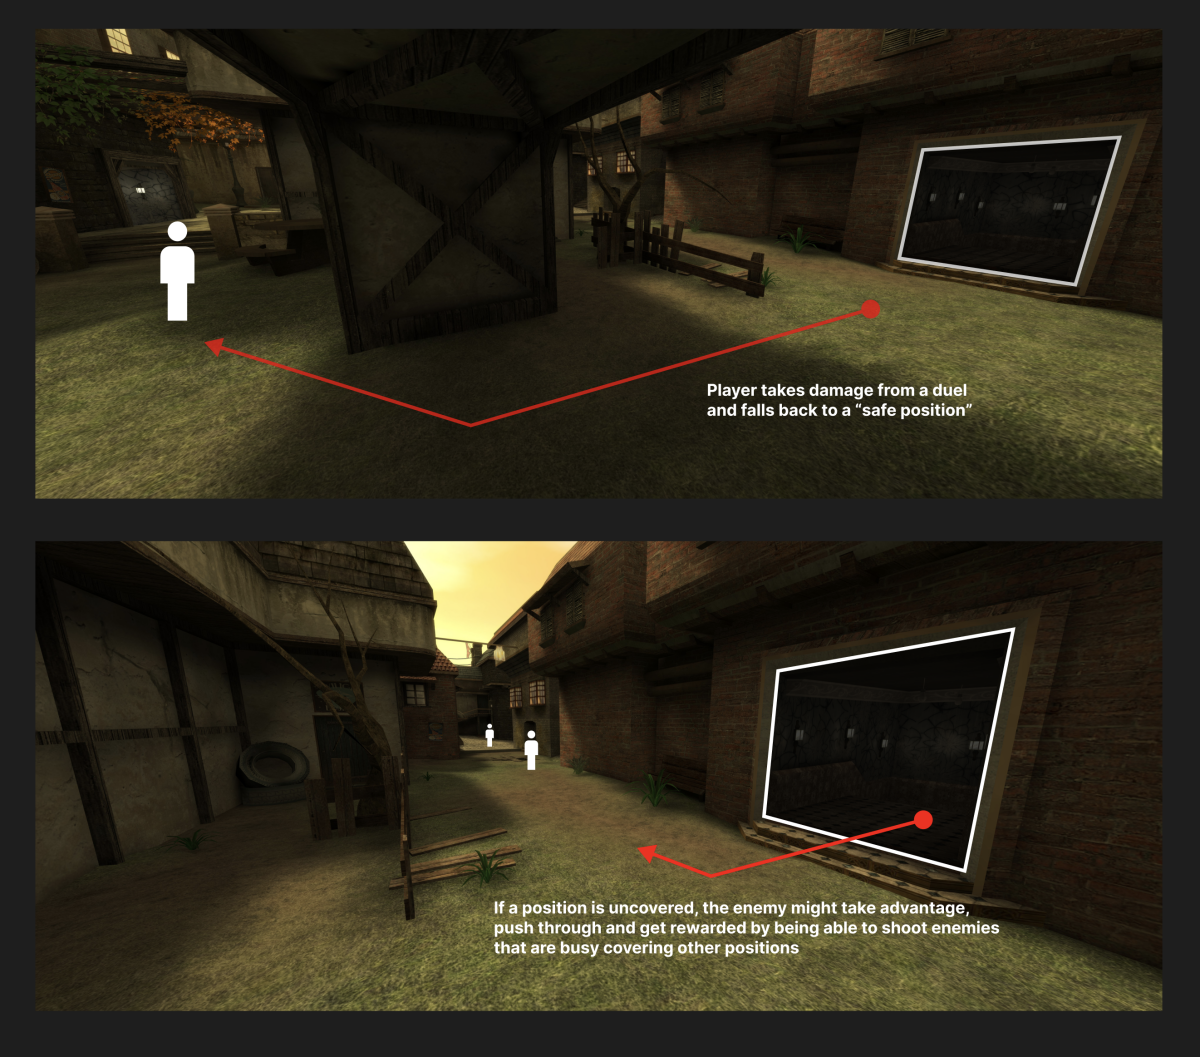
- When a player takes damage in a duel, they often fall back to a safe area in order to medic up. This depends on the map layout and position but is a common occurrence in competitive gameplay. Once the player leaves the position, they willfully give up control and leave it open for a moment, possibly communicating to a teammate to take over the cover for that position momentarily.
-
Example: Tohunga tank player gets damaged by a nade, falls back to tables to medic up.
-
- Players take advantage of situations where the enemies are subsceptible to pushes to get an advantage
-
Example: Player or teammate has damaged an enemy, then the players communicate to rush and try to finish off the enemy before they have the chance to medic up.
-
- If otherwise outnumbered, players often fall back with their remaining team members to group up and catch enemies off guard when they are overextending and/or rushing alone.
-
Example: Two teammates die at hotel, the remaining players group up at tank in order to prepare for the enemies to push them. They position themselves in a secure area to limit the possible locations where enemies can push them from.
-
How Team Survivor maps are played
- Popular competitive maps are often divided into two clear halves (red team and blue team) separated by a (often horizontal) midline with 3-4 chokepoints that lead you from one half into the other (Delirium calls them "Standoff" maps).
-
ut4_casa: Timbers, Bridge, Gate, Narrow
-
ut4_tohunga_b8: Bridge, Middle, Corner
-
ut4_prague: Fountain, Reception, Street, Woekele (not a horizontal line here)
-
ut4_orbital_sl: Servers, Red Room, Infirmary, Globe
-
- Each chokepoint should be designed to be covered by 1 or 2 players.
- 4 players are assigned to cover their positions (either 1/1/1/1 or sometimes 2/1/1 depending of the number of chokepoints on the map) while 1 free roaming medkit player reinforces the most contested position and supports by medicing damaged players.
- Maps that do not have clear chokepoint positions are often avoided in competitive play, since they encourage for the team to stack together in a group of 5, which hinders certain tactical and teamplay elements of the gamemode.
Additional map structure principles
- The transition between ally and enemy territory should be visually clear. Players should always understand when they are pushing into enemy-controlled areas (aka. crossing the midline)
-
Tohunga Example: Tohunga (Tunnel spawn) encourages the players to move towards the midline of corner/mid/bridge. They can reach those destinations without (in the usual case) being exposed to an enemy player directly. If enemy players are peeking in one of these position, they are in the disadvantage and taking a risk by pushing forward into an area where they are possibly facing multiple enemies.
-
Casa Example: Casa encourages the players to move towards the midline of Timbers/Bridge/Gate/Narrow from both sides of the map. They can do so because the open layout allows for teammates to support each other on their individual chokepoint positions quickly.
-
- If this transition isn't clear, it leads to camping, overly defensive play or "teamrunning". Players hesitate to push forward when they don't understand the risk exposure.
- The individual positions/chokepoints should have a limited, but well thought out set of cover points where players might position themselves. When a player is peeking from a chokepoint towards the enemy controlled area, they should have an idea of where the enemy might position themselves. An overly high amount of potential spots will slow down the gameplay due to the unwillingness of exposing yourself to an unwinnable situation when peeking.
Spawn Design
Spawn placement
- Spawn areas should not be overly protected or designed as defensible objectives.
- Spawns can be open, or located in areas not worth defending
-
Example: Austria tunnel up spawn, Orbital main spawn
-
- This helps prevent spawn camping and encourages players to leave spawn and take positions closer to the midline.
- If players don't move toward the midline, they fail to support teammates and leave gaps that can be exploited. A player not holding their position can cause another to be flanked or picked off - leading to frustration and imbalance.
-
Example: Tohunga: Fence side tank player does not cover corner, enemy is pushing and kills teammates at middle & bridge from the side.
-
- Consider how far away the spawns are from the covering positions. If a player requires their entire stamina bar in order to reach the defendable position, then they will have to take a break and regain stamina before being able to engage in a fight.
Multiple spawn locations
- Multiple different spawn positions per team encourage more dynamic gameplay and might adjust how individual rounds are played.
- Spawn selection in UrT TS is completely random. This should be considered when planning the spawns. If the spawns are designed in an imbalanced way, and a team is unlucky and spawns in a "weaker" spawn more often than in a "stronger" one, then this can have a major impact on the result of the match.
-
Example of multiple spawns: ut4_prague has two sets of spawns that behave very differently from each other. Golden Lane / Castle spawns are usually slow and allow both teams to properly set up on their side of the map. Execution / Woekele spawns position the players very close to "rushable" positions and encourage a different approach to the round. This creates a nice balance between slower and faster played rounds during the match.
Grenade Design
- The player should understand over which buildings/structures he can throw nades. Avoid creating invisible clips in the sky. Rather allow for the sky to be open and nadeable everywhere and adjust the positions/chokepoints in a way that gives safety from nades wherever that is wanted.
- Think about how nades can be used when designing individual positions. Nades are a core gameplay element for the most contested and high skill positions in the game
-
Example: Tohunga hotel, Tohunga mid, Austria wall, Austria mid, Prague woekele, Orbital globe, Pipeline mid, Kingdom mid (also called Pearl Harbor, due to level of bombing happening on that position)).
-
Advanced Pathing & Neutral Routes
- Beyond the main chokepoints, some maps have dynamic (sometimes neutral) pathways that allow for players to adjust their approach by flanking a certain position from the side or from behind, or allow for creative rotations across the map:
- Neutral pathways / flanking routes that are connected to chokepoints. This actually encourages the players to cover the chokepoint, to avoid the enemy of having the option to take the neutral route and flank one of their teammates.
- Pathways / rotations on allied territory can be used to quickly rotate between positions and regroup with the other members of the team.
-
Example: Casa's street and old alley, Tohunga's "street"
-
- These can complement the core structure of the map with more dynamic gameplay options.
Movement & Elevation
- Urban Terror's movement system is unique - walljumps and fast movement elements are core to gameplay.
- Incorporating elevation that reward skillful movement and give players vertical choices enhances the enjoyment of the map.
-
Casa's bridge/patio/narrow etc
-
Tohunga's bridge
-
- A good mix of fast movement and slow movement areas are key.
- Some positions might reward fast movement for an advantage over the enemy player.
- Others might be tight and cornered, and force the player to slow down for a specific gunfight.
Avoiding Unfair Design
Headglitches
- A headglitch is a spot where a player can fire while only exposing their head, making it extremely hard for enemies to return fire.
- These positions create unbalanced duels and will be abused by competitive players (They should be used very sparingly and carefully).
- Avoid placing headglitches at key chokepoints or common engagement areas, it will discourage players from taking fights on these positions.
-
Example: Orbital's blue box is a common "camping spot" that gives the player behind it a huge advantage when dueling.
Invisible Clips / Railings
- Invisible clip brushes in places where players expect to shoot through are annoying and lead to frustration.
- Any surface that blocks bullets should be visibly solid (if in an area of gameplay relevance). Players should know exactly where they can shoot and be shot.
-
Example: The clipping of Tohunga's upper bridge railing blocks bullets in some areas that are visible.
Fall damage
- Spots in which players can fall down (especially from heights where they can potentially die) should be used carefully. In Team Survivor the player's focus is mainly occupied by the positioning of their enemies and teammates, especially in high pressure situations. "Traps" near competitively relevant positions of the map should therefore be limited and/or well considered.
- Cushion spots (areas where players do not take fall damage at all) should also be used carefully.