
Using GTK's Clipping tool
The Clip Tool (X key) is one of the most useful and powerful tools in Radiant. However, any mapper who has tried to make a complex geometric shape knows that the clip tool has a big limitation.
Most people only know that the clipper can cut along the three coordinate planes (the x, y, and z planes). But what if you want to cut a shape that can't be represented with flat sides when viewed in any of the 2D views? For example, a hexagonal pyramid. Can't be done, right? You can cut two opposite sides from a side view, but Radiant can't line up the other four sides.
You're stuck, and your map has to have a boring, conventional, square pyramid. However - this isn't really the case at all. You can make such a shape by using the vertex tool (V) to pull the verts of the brushes around, but a three-point cut is arguably cleaner and easier.
Planes
A plane is a geometric shape defined as an infinite region extending in two dimensions with a specific orientation. Think of a plane as an infinitely thin sheet of paper - it has width and length, but no height at all. The paper is stiff (it can't be bent), extends forever, and can be held at any angle. Planes can be uniquely defined by a minimum of three points.
Think about how that works for a moment... a line can be defined by two points - the "ends" that the line connects. To make the line into a plane, you need a third point to figure out at what angle the plane cuts through the line. Any three points in space, with any x, y, and z coordinates, define one and only one plane, but a plane can be represented by many combinations of three points.
When you use the clip tool, you are really defining a plane. The part of the brush on one side of that plane is cut off - the plane is like a knife. You are used to two-point cuts, where you are defining a line with two clip points...but that is really a plane. You are looking at it edge-on. Three-point cuts allow you to define clipping planes that you cannot see edge-on.
Making the Cut
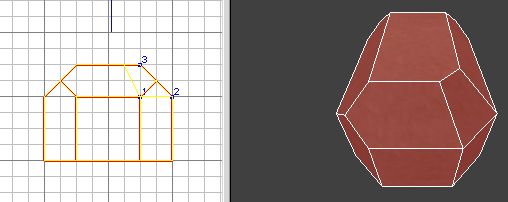
Let's say you want to make a shape like a cut gem:
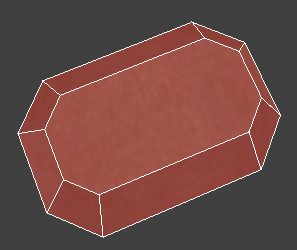
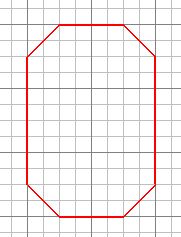
Start with a rectangular brush. In the XY Top view, cut off the corners to make a stretched octagon, like this:
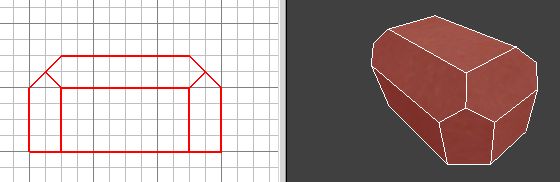
Now, start to cut the sides so that they taper inwards. You can easily cut the left, right, front, and back sides to angle in (be sure to leave part of the gem sides vertical, and make sure all the cuts of opposite sides are symmetrical).
But now how do we do the "half" sides of the octagon? Say, the lower-right. You're probably already thinking "three-point cut" by now, so let's move into the practical how-to's. Start by selecting the brush and the clip tool.
Now we're going to define a plane with three points - remember how three points can only define one plane? Let's think about where we want our plane to be. It should look smooth, and fit in with all the other facets of the gem. So, we already know two of the points - the outer corners of the gem.
Go ahead and click on those two points in the XY Top view, just like making a two-point cut. Now for the magical point #3 that will turn this into a plane. We want the gem to angle inwards from all sides, so pick a place where the right-side angle meets the top of the gem, but slightly above the corner, and click to make the third point.
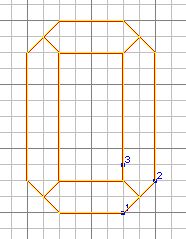
Now, this plane isn't complete. Right now, all our points are lying flat in the z dimension. Time to fix that! Switch to the XZ side or YZ side view, and you'll see that all your points (labeled 1, 2, and 3) are lying in a line. Clip points can be dragged, so that's what we do to set them up properly.
Remember that points 1 and 2 are on the outer corners? Those corners are at the base of the angled sides, so drag those clip points down so that they are exactly on those outside corners. The third clip point goes on the uppermost surface of the gem, so drag it up to the top. Don't drag any of the points sideways.
Press CTRL+ENTER if necessary so that the inner part of the gem will be kept, and then press ENTER. Voila! One corner down! Go ahead and finish the other three corners. You should already be seeing the applications of this tool: irregular rocks, half-fallen walls at weird angles, control decks with sloping walls, etc.